Other Stuff

Installing the Super PID into my router. Once I have this hooked up and running, I’ll be able to dial in any cutting speed within a couple of rpm. Sweet. That, coupled with the right bit should let me cut, carve and engrave wood, plastic and acrylic materials. Quite a learning curve here but it’s way fun.

Note: This page gets hit a lot and I’m sorry I don’t have more specific instructions on doing this mod but it’s all together now and works really well so I don’t want to take it apart to do a tutorial. I do remember this being rather easy, its basically as simple as bypassing the speed controller. I think I made one wire cut, drilled the hole and used one piece of shrink tubing. I followed the generic instructions on the Super PID page. Everything works very well, the LEDs still light up the work area and the PID lets you dial in the RPMs to within about 10 or so. It holds that RPM even chomping on some hard pine although I generally use mine to cut sheet styrene.

Another item: BE CAREFUL mounting the sensor, it must be VERY secure. Mine came loose after about 9 months or so and crept into the router. It didn’t hurt the router but it did grind the sensor down to a nub and destroyed it. Turns out it’s more or less easy to fix, a sensor can be had from Mouser.com electronics the part number is 512-QRE1113. However it will bring you to a complete stop as far as cutting out parts so beware. (2/22/2016) I’ll try to post up more pictures of my mods when I fix this.

Probotix X90

Everything is now together, refurbished LinuxCNC PC, all the motors hooked up and working. Now I’m figuring out all the settings and things like accelerations and feed rates and all that. I can now see the benefits of limit switches, particularly as new as I am at this whole thing. But it’s coming together nicely, I’m quite pleased with it. It will be a while before I can actually try to cut something out but so far so good.

Maker Space

space-sml
X90-sml

I wish I had a ‘before’ picture of this, you would not believe the disaster that was my shed!

Tons and tons of junk piled all over the place. Nasty. Nevertheless, after much physical activity and throwing away of ancient artifacts, here is my new floor and nice solid bench work. Talk about a strenuous weekend, I strained muscles I didn’t know I had. Ouch.

But it was worth it. I finally got started assembling my Probotix X90 3D Router.

Along the way I also lucked into a bunch of surplus windows boxes and flat screens so I promptly wiped em and installed Ubuntu. Sweet. They all have printer ports on them too, perfect for the X90 control box and Linux CNC. You can see one in the corner there.

I still have a ways to go, I’ve ordered a Super PID so I can dial in a router speed and cut plastic, in particular, styrene sheets.

A 3D printer at some point would also be nice but one thing at a time, eh? ha.

people-sm

So here is the collection. This is all of the resin casts I’ve done that have turned out ok. I have another, smaller pile of rejects but that’s part of learning how to do this. I think I’ve come to the limit of this particular process and tool chain. I need to step up to a more detailed 3D print and a vacuum system for the molds and resin casts.

The crew

thecrew

My crew of 3D people so far. Some are prints, some are resin casts. It’s quite a bit harder to get good results than I thought. Making molds is an art form unto itself. Click on the picture to see a larger image.

bt

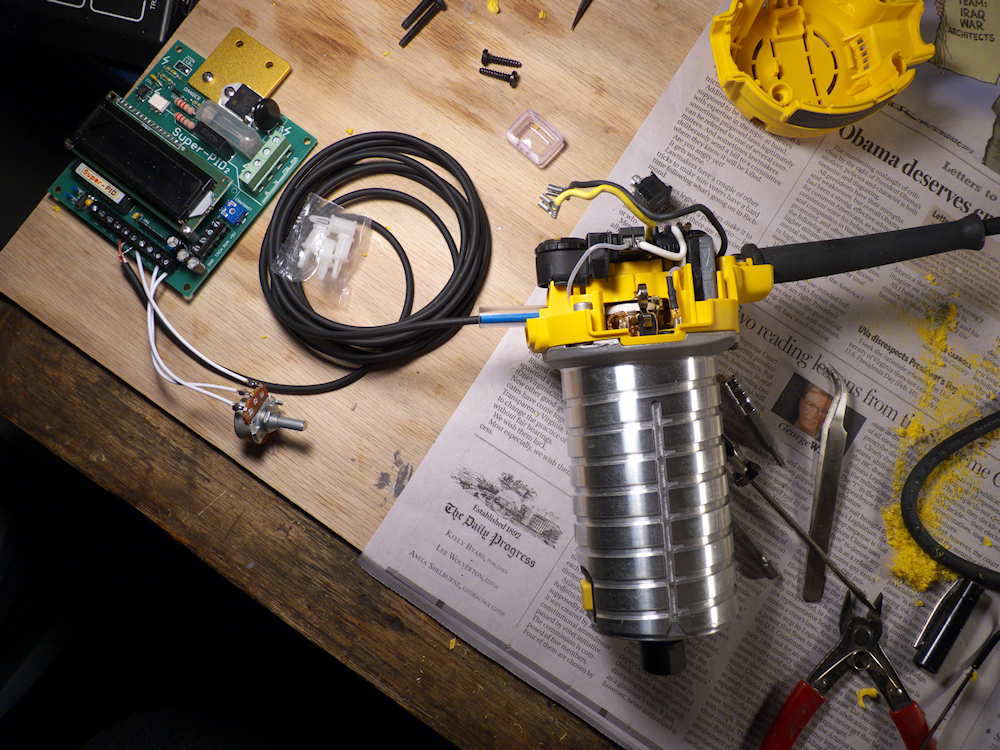
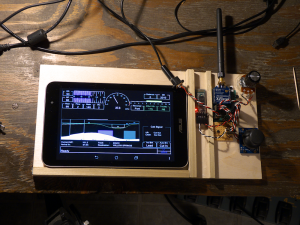
I’ve started some development for a new throttle controller, this one is based on an Android tablet for the user interface. My approach is a bit different than what is out there for tablets and smartphones though. I don’t like ‘sliders’ on a touch screen for controlling vehicles, so the idea here is to interface a small analog joystick (the parallax unit) and a potentiometer to do the actual control. The tablet will be used to pull up user interface screens for the locomotives and also have screens for controlling other things.

Basically, I’ve connected a generic bluetooth interface (about $10) to my Xbee Widget controller. The Widget can be configured to have up to 8 analog inputs, I’m using 3 of them here. I have the bluetooth interface on the spare serial port. On the other serial port is the Xbee which actually sends the commands to the locomotive.

I’m using PyGame to build Android apps with because I love Python!

Right now, the only thing on the screen that actually works is the speedometer. This is a screen shot of a Positive Train Control screen I dug up on the internet. I’m not sure what most of the other things on there are so this is just for playing around for now. But hey, it looks neat!

So anyhow, since I looked high and low and found ONE reference on how to scan the BT devices with Python, I decided to post up some python source to help out anyone looking to do this. As with most Python things, it’s really quite easy once you get the particulars ironed out.

To use this, just pass in the name of your bt device after you instantiate it. This is the same name you see when you pair your device with your tablet. In my case, it’s ‘HC-06’.


bluetooth = Bluetooth()
bluetooth.prepare("HC-06")
bluetooth.write("--testmessage--")


Here is the method. Note that the UUID in the device create is the same for all BT devices (as far as I know).

Jnius is a nice package that lets you call Java from Python so this could be used for other things besides Bluetooth I guess, but that’s another project. I really detest Java so anything I can do to write Android apps in python is great.


#
# Bluetooth interface class for PyGame- Python Android Games and Graphics development
# you will need the jnius python library to use this
#

import pygame
import sqlite3
import math

try:
   import android
   from jnius import autoclass
except:
   android = None

class Bluetooth:
    def __init__(self):
        self.BluetoothAdapter = autoclass('android.bluetooth.BluetoothAdapter') 
        self.BluetoothDevice = autoclass('android.bluetooth.BluetoothDevice')
        self.BluetoothSocket = autoclass('android.bluetooth.BluetoothSocket')
        self.UUID = autoclass('java.util.UUID')
        self.deviceValid = False

    def prepare(self, name):
        paired_devices = self.BluetoothAdapter.getDefaultAdapter().getBondedDevices().toArray()
        for device in paired_devices:
            if device.getName() == name:
               self.socket = device.createRfcommSocketToServiceRecord(self.UUID.fromString("00001101-0000-1000-8000-00805F9B34FB"))
               self.recv_stream = self.socket.getInputStream()
               self.send_stream = self.socket.getOutputStream()
               self.socket.connect()
               self.deviceValid = True

    def write(self, sendString):
        if self.deviceValid:
           self.send_stream.write([ord(b) if ord(b) <= 127 else ord(b)-256 for b in sendString])

    def read(self):
        datastring = ""
        if self.deviceValid:
           c = self.recv_stream.available() 
           if c > 0:
              for i in range(c):
                  datastring = datastring + chr(self.recv_stream.read())
        return datastring
        
    def close(self):
        if self.deviceValid:
           self.socket.close()


Finally got my control system tested out in the woods. Very happy with the range. The Xbee will do 300ft and I can’t even see the RS3 if I go that far away. This is my controlwidgets.com design. All the wireless communications are handled by the Xbee. I can send any sort of data to or from anything with this system in real time. Those are 16 byte data packets that are controlling the throttle and coupler servos.

The RS3 has the throttle, front and rear couplers and single channel sound all hooked up and working. All of it is powered by a 5000mah hour LiPoly battery driving a Pololu 18v7 motor controller. The control widget drives the servos directly. There is also an RFID reader under the fuel tank which works quite well too.

3DClones

The results of my latest attempt at mold making and resin casting. 3D print original and his clones. These guys are about 2.5 inches tall or 6 ft in 1:29 G Scale.

I’m trying to get these to a point where I can make consistent resin casts from 3D figure models.

Anyhow, this is the sixth or seventh? iteration of mold making and so far the best. I do think I need to explore some of the finer points of this process but for now I’m finally getting decent results.

Buy my 3D Printed Peoples from Shapeways

More 3D People here