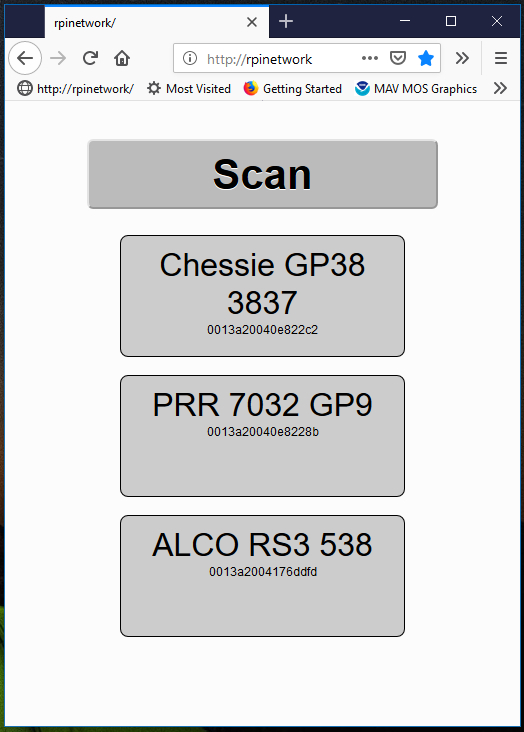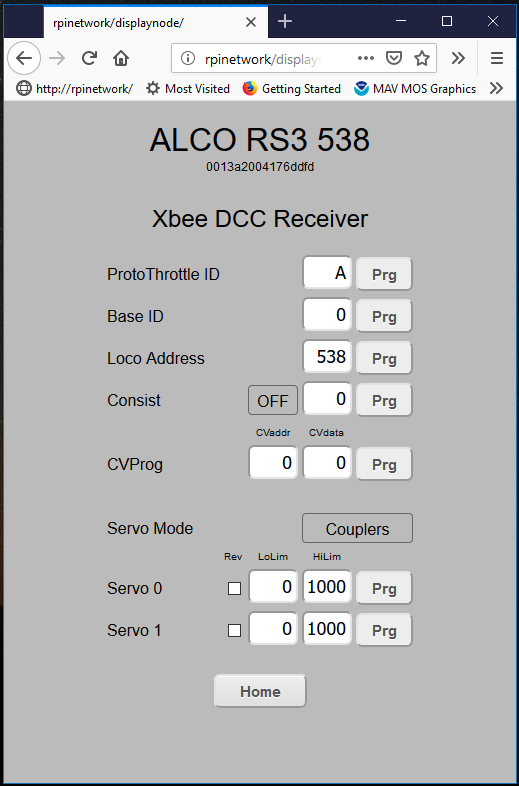
I thought I would post an update on my system progress. Above is a shot of the Protothrottle and the node configuration screen. I’ve got this almost finished, I only need to add some refinements for the servos in order to do live steam or in the case of diesel DCC locomotives, control the front and back couplers.
Anyhow, to recap some of what I said in previous posts- the configuration web app runs on a Raspberry Pi Zero W which is configured as a stand alone Linux server. I did this so it will work on any display device using a browser- phones, tablets and computers, regardless of brand (IoS, Android, Windows, Mac). The hardware is very similar to the ISE ESU hardware, in fact, it’s almost identical. (a pic is in one of the posts below)
The Zero is configured as a Wifi access point with DCHP and DNS. Backend services are provided using Flask (python) with an html and javascript front end. I’ve added MySql and Redis to keep track of things and there is a background process that runs all the time to handle the root access to the Xbee board. It sounds complicated and the software was a bit of a challenge but once its configured properly, it just works.

I’ve tried to keep this very simple, above is the main page when you connect to the RpiZero web server. You can click or touch the ‘scan’ button and all of the Xbee devices on the network will be queried and saved. You can then click any of the nodes to ‘zoom in’. Each node will support a DCC output and servo outputs. I run both diesels and live steam so I am building in servo control for both. ‘Diesel mode’ will be used to control the two couplers on a battery DCC locomotive. ‘Steam mode’ will allow the throttle and direction controls on the PT to move servos in a live steam locomotive.

Here is a shot of the main node configuration. There will be another screen when I get my ‘Airwire Translator’ working but that’s a whole other project. I do have the basics for that coded up and prototyped but it will be a while before I get that one together.
Anyhow, a few specifics on the parameters- the Protothrottle ID and the base ID are pretty much fixed unless you want to run multiple combinations of protothrottles- the Xbee DCC Node looks at both of these values and they have to match or the message is ignored.
The loco address is (obviously) the address of the locomotive you wish to control. Unlike normal DCC implementations, I don’t change the DCC address on the decoder- it’s always set to the default- 3. Since the Xbee Node only talks to one DCC decoder (internal to the locomotive), it just makes things more complicated if you change it so I require it to be fixed. The Xbee addressing and messages take the place of the DCC ‘network’ (ie, the ‘track’)
Below the Loco Address is the consisting setup. You can set consisting to OFF, FWD or REV and then enter the address of the lead locomotive. If anything other than ‘OFF’ is set here, the Xbee node will respond to the consist address and ignore it’s own address. Since the Xbee message is broadcast to all locomotives at the same time, this gives you unlimited consisting.
Below the Consist setup is the CV Programming parameters. Enter any CV Address and data into these windows and press ‘Prg’ to send a CV programming command to the locomotive. At some point I will expand this to include english language setups for both the Soundtraxx TSU-4400 and the TCS Wow 501, but for now this gets the job done.
Next is the servo setup. There are two servo modes, ‘Couplers’ and ‘Steam’. Couplers (servos) can be assigned to the DCC function codes to open and close them. This is not completely implemented yet, but the hooks are there. In ‘Steam’ mode, the Protothrottle throttle lever will be passed to servo 0 (taking into account the low and high limits) so that you can control the speed of a Live Steam Locomotive. The second servo will then be used for direction control. For both of the servos, regardless of the mode, you can set a reverse and a high and low limit.
So, that’s about it. I will be installing all of this in a couple of my locomotives to do some ‘real world testing’ once the weather improves a bit and spring rolls around.